to my blog. Just a collection here of stories of how life happens by to one obsessive, passionate, distracted, curious, creative, regular dudette. And oh, yeah, i hope you like my new scrolling header. I just get kick out of it. >>>

  • /
  • /
  • /
  • /
  • /
  • /
  • /
  • /
  • /

finding my inner vision

Posted by Au Lim On Thursday, August 06, 2009 1 comments


long time no kwento! after a reaaaally long while off blogging, i am resolving to come back to it. let's hope i can keep this promise to myself. ok, i'm not very good at keeping promises to myself. case in point-: my project 365. i always fall off! i'm starting to doubt that i can never pull the darned thing off. if not for friends who are with me on it, hihinto na talaga ako. (as an aside: i RE-started for the 3rd time [or 4th?] project 365 which entails taking one photo per day. this time, just to have added motivation not to stop, i made a bet with 6 other friends--actual money involved--and i still fail!)

-------------------------------

what i'd really like to blog about first is about this photography seminar i recently took at PCCI. i don't do too many seminars, mostly due to financial reasons. if i have extra dough lying around, i would probably blow it first on camera accessories or save it for some new glass. see, i like things that are tangible. when i feel the need for some photography education, i would rather buy books.

my second reason for holding back on seminars is: i choose mentors and classes carefully. i understand now that in photography, or any other artform--there are plenty of 'styles'. since i don't have the luxury of spending too much, i try to choose carefully the mentor's style that would match what i would like to emulate.

however, there is something about the 3rd and latest workshop i took which was called Inner Vision. the mentor is a person i admire a lot because i see his work in I-Mag, Mr. Tilak Hettige. I had always been curious at how his name is pronounced, and learned then that it is just as it is spelled. He hails from Sri Lanka. He also authored a couple of beautiful books: Saffron Robes --a beautiful photographic essay on Buddhist monks which of course impressed me immediately being buddhist myself--and Tilaka. another photo essay about the spiritual third eye from which is own name was derived.

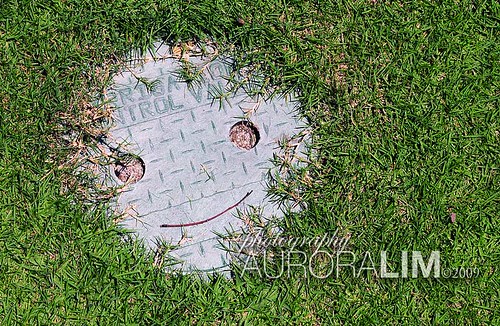
he met us first for a short intro on June 25 but the real first class was the whole day of a Saturday, June 27. the first exercise was at Greenbelt. he asked us to find letters and numbers in the environment. my first reaction was whaaa...?! and then 3 seconds later, i thought, cool challenge! he gave me this to find: MARK LBN98. i think he shuffled the participants names and added a few more random letters which made it look like a plate number. he told us not to worry too much about the exposure, just set the cam on auto and concentrate on finding the letters instead. we had 1 hour complete it. this was my take:

this is the 'MARK

and this is the 'LBN98'

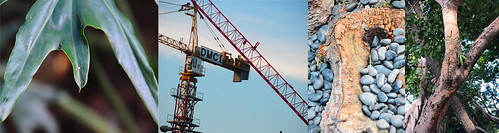
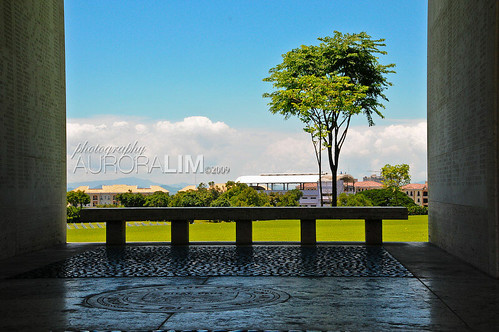
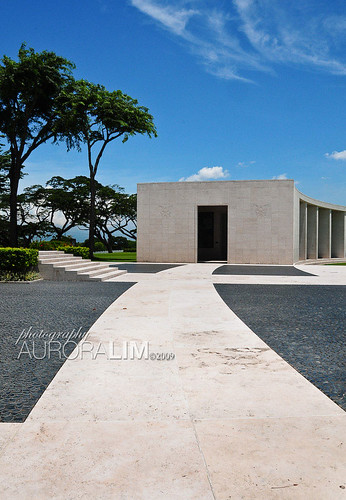
after this, we headed back to class to download and there were more lectures. next we headed out to the American Cemetery for more exercises. it was midday and very hot. but we nevertheless had a good time shooting and learning about leading lines and composition. i was wishing i bought the UWA (ultrawide angle lens... hey, i didn't invent the weird photog lingo :-D) with me at this time. these are some of the shots i took.


the next meet was a Sunday at Tilak's house which surprised me. it was absolutely amazing how gracious a host and how generous a teacher he is. now only did he share to us his wonderful home that day, he also showed to us his collection beautiful photos and old cameras! and, oh yeah, wonderful food was served too...

coconut milk rice squares ever so slightly salty


lemon squares and Tin's yummy cookies


Tilak showing us an old treasure. one of the cameras in his extensive collection


and talks about the elements and stories behind his impressive photos.

the previous meeting, we were assign a photo essay topic so we discussed this with him that Sunday. then we had 5 days to complete it! the presentation was on the 6th day and it was needed to graduate from the course. my photo essay topic is called The Awakened Eye. i uploaded it on youtube for your (actually, MINE) viewing pleasure. between the day job and the effort needed to complete the task, it was pressure! but i learned later that this pressure was part of his learning process. without it, we would have completed it differently and it wouldn't be any less harder. i think i understand now what he meant.

after all that, i can say our mentor succeeded in what he set out to do. i would never have found that sort of "inner vision" without taking his class because i wouldn't push myself hard enough. the exercises he gave us in between practice shoots was right on because they put us in a certain frame of mind. i definitely highly recommend his class. you'll probably surprise yourself at what you will be able to come up with. i know i did.


oh, my poor blog...

Posted by Au Lim On Wednesday, July 29, 2009 1 comments
it's Facebook's fault... those little status messages i can so easily churn out at any time is killing my desire to blog and tell stories. but i'm thinking, that should change soon... maybe even right now.

i should learn to tell more concise stories more often if i am to keep it up. sayang naman... this blog has been around for a few years already. maybe, i, my kids and my friends will enjoy it too years from now, looking back at the stories. it's probably not a good idea to just let it go static.

i guess my other blog at Vox might just have to retire if i am to maintain even just a couple of blogs. perhaps i'll just put that project 365 here instead...

i feel a redesign is in order. those new blogger templates are looking good... let's see...

make the connection

Posted by Au Lim On Thursday, July 16, 2009 0 comments
In the market for a practical Hyundai Genesis ? Need to find reviews for that SUV you are eyeing like that cool GMC Sierra hybrid ? Or just generally daydreaming for the spanking new big-boy/girl-toy-on-four-wheels 2009 Audi A6 that you are promising yourself once you get that fat annual bonus? Whether you want a vehicle that is green and practical or one that is big, bad and rugged, here's a connection for you: thecarconnection.com

Personally, I need a new vehicle myself right about now. My daughter has been carting my ride away which often leaves me homebound and carless. But before I even step out of the house and on to a car dealership, I find it more convenient to check out what's on the net first. I would look for car reviews, recommendations for my needs, scour forums and generally spend time on online classifieds because it's a lot more economical and faster which makes it smarter. See, I like being smart, or at least seeming to be. :-)

This great website I stumbled on is perfect for this because not only does it have great reviews for practically any car make and model I want--which, just by itself is a great feature--but it also has classifieds (not that its much use to me being not in the same country… but it could be useful to you), information on insurance, financing and even forum style tips. Amazing how everything is just right there. All the know-how you need when you want to get yourself a new car. In my case, even without being in the same continent, the information is just fantastic and definitely useful. Just check it out for yourself.

smart shopping

Posted by Au Lim On Friday, June 26, 2009 0 comments
I like shopping on the net. I don't have to get in the car, go to the mall, browse through shop windows and eventually end up going home buying more than what I really need. In today's economic and environmental scenario, it makes sense to save not just money but time and energy as well. Being earth-conscious, I would also like to think online shopping has less carbon-footprint than riding a vehicle to the store.

However, when I shop on the net, I end up with too many tabs in my browser window. That's because I have to study my choices well so I browse through many, many websites, both for the shops and the reviews. IIt can get very confusing, not to mention just as time consuming as actually going out shopping in real life. But I discovered one site that makes my shopping life even easier--ShopWiki. Unlike browsing through different websites, you only need to deal with one. That's because ShopWiki crawls the web then searches and indexes all info about a particular product much like Google. Simply enter a brand, article or item you would like to find anywhere in the world and it turns up results with matching photos to make your search experience even better.

As a concrete example, here's one on a laptop search. Not only does it turn up a variety of computer laptops classification to help organize your search but clicking each segment educates you as well to actually help you make your choice! Truly informed shopping. I think it beats going out an talking to salepeople who will only try to convince you to buy only their product and potentially mislead you. I suggest you go and try it right now and see if its not shopping-truth I'm telling you! :-D


chronicles of a travel virgin

Posted by Au Lim On Wednesday, April 01, 2009 2 comments

I'm a bit shy to admit it but yes, I am a travel virgin. It took me almost 43 years before I even stepped out of the boundaries of my cushy little world--not that I had any real complaints about that. I am actually afraid of riding anything that takes my feet off solid land. I don't like airplanes and most especially not boats. Of course, being a mother of 3 very early in life doesn't give me much choice anyway and with 2 more kids later, it doesn't leave much cash for expensive trips either. But luck sometimes just falls in one's lap and an opportunity showed itself for a 6-day Macau-China-HK girl trip: me, MIL, SIL, and my elder daughters Gabey, 18 and Kara, 14.


From the time SIL told me to fix the kids' passport for this journey, I psyched myself to overcome my phobias and planned which of my stuff to pack. I have to say the opportunity to take my camera to strange lands that promise magnificent photo ops helped a lot appease my fears. So here goes the story of my first journey away from the islands I call home:


March 22- Macau

We left Manila at around lunchtime and arrived at Macau shortly after 2pm. It was a barely 2-hour plane ride which was cool with me. The shorter, the better! I kept the fear at bay by taking photos. So now I know of another panacea that makes everything alright for me besides chocolates: my Nikon.


I knew we were staying at The Venetian for a day. I heard it was a really nice hotel but goodness, I didn't know it was not just nice but GRAND! Even our room was totally FA-BU-LOUS. It had 2 queen-sized beds (that really looked like they were made for queens) not just one but two TV sets and a living room area. The view wasn't as grand though because all I can see out the window were new hotels under construction. This side of Macau is still young and developing.


We spent the rest of the day just strolling around the hotel since we have no plans of doing the casino anyway. I am not very lucky with games of chance. Besides, it doesn't interest me much where I'm not allowed to take my camera. With 2 teenagers in tow, we weren't even allowed to cross the casino as a shorter route to our room-- and they were really strict. Even Gabey who was just 3 days shy of being 18 wasn't allowed. The guard told her she can come back in 3 days. Too bad for Gab who was so disappointed she wasn't even able to peek in a casino.


Taking the long route to the room was not a bad deal anyway. We had to pass through Level 3 where all the shops were. There were so many things to see. There was an indoor Venice-style 'canal' with gondolas and gondoliers who sing, some of whom were Pinoys.

This mime looks Pinoy to me. I couldn't ask him though because he wasn't allowed to smile, much less talk.

It seems this other mime was too beguiled with a joking Gabey that he wasn't able to resist a bit of a smile.

We then explored the outside of the hotel until almost sundown and we were feeling the pangs of hunger. We went back to the hotel to plan our next day and then retired for the day. As usual, I couldn't immediately fall asleep in strange places so I did some journaling. I was sorely missing my 2 babies who still sleeps with me and hubby. Being in such a romantic place only made me miss him badly as well. I cried myself to sleep that night and for the next 3 or 4 nights after that.


to be continued with more photos and stories...

Day 2 - Macau to HK
Day 3 - Shenzhen, China
Day 4 - HK - Camera shop-hopping and the Night Market
Day 5 - HK - More shopping
Day 6 - 'Can't-wait-to-go-home' day..


macro on shoestring

Posted by Au Lim On Wednesday, March 18, 2009 1 comments

i love macro. i'm usually homebound (hello mom of 5 kids :-P) and seldom travel so this is one arena i can play with. it also appeals to my inner geek, since it mostly feels like peering into a microscope. therefore, among the lenses on the top of my wishlist is the Micro Nikkor 105mm f2.8VR. if i were to push it, i'd also love to have the Micro Nikkor 200mm f4. thing is, i can't afford them yet. here is my next best thing: el cheapo extension tubes. they make me have the ability to focus closer to the subject, hence magnification, but i lose the ability to focus at objects that are further away.

the extension tubes have no lenses

so my next solution is to get me real macro glass. since i don't have moolah to score my dream lenses, i opted to get one of the Nikon (really) old "legend" lenses: the Micro Nikkor 55mm f3.5 AI. i won it for a good price on Ebay. if i attach it to the extension tubes, i get even more magnification.

the teleconverter has optics

but i wanted MORE and so i went for a teleconverter next: the Nikon TC-201. this is another old model glass but since i have an old micro glass anyway it makes sense to me. i hunted yet again on Ebay and got this just around Christmas last year :-D this one i love for giving me the magnification without having too come close to the subject so it is less likely that i'll scare a bug away. i am also able to focus at a far away object. the teleconverter effectively doubles my focal length. the downside is losing light-- 2 aperture stops--and (they say) some image degradation. being inexperienced, i hardly notice the second point... or maybe, i'm just too happy to get the extra magnification.

if i combine them all together, i get pretty cool results, too. this shoestring macro combo suits me just fine... at least for now. i don't mind them being totally manual focusing since i prefer to do macro on manual anyway. here are some sample shots.

shot with the 55mm Micro


with the 55mm Micro + extension tubes


with the 55mm Micro + teleconverter + extension tubes

*photo at the very top: taken with this same combo but cropped closer.

these stuff don't meter and won't report aperture settings to the EXIF on anything less than a D300 (yep, not even on a D90). and this is another reason why i *heart* my D300. :-) there will be no electronic controls for the aperture settings either. however, they are still usable because i did use them even on my trusty D40. but being old gear, this means i can also use them on my old film camera, the Nikon F4. adventures with film in the future but for now, there's miles more to explore on digital.


i SEA food!

Posted by Au Lim On Friday, March 13, 2009 4 comments
sundays are often seafood days for us simply because i do marketing on sundays and seafood are always best cooked fresh. i'm sharing here a couple of recipes that often find it's way on our sunday lunch table. if you like spicy, Thai-inspired flavors, you will certainly love this one. it's a modified version of something i tasted at a friend's party quite some time ago. i couldn't forget how delicious it was so i tried reproducing it. this is the result. the broth is warming and yummy while the tahong meat is tasty. it's a real pleaser for spicy seafood lovers.

Au's Spicy Basil Tahong

ingredients:

2 kilos fresh tahong (mussels)
2-3 tbsps. Lee Kum Kee black bean garlic sauce
10 or so cloves crushed garlic
about a thumb-size of ginger, sliced
2 or 3 Thai bird chilis (siling labuyo)
about 1/4 c rough chopped fresh basil leaves
1 cube chicken bouillon (Knorr cubes)
1/2 a stick of butter (about 1/4 of a block of anchor)
2 tbsp. veg. oil for sauteing
soy sauce (if needed) to taste
2-3 cups water or chicken broth
about 5 calamansi (Philippine lime or kaffir lime)

steps:
1. clean out the mussels, removing the "beard" from the meat but leaving the meat in the shell. set aside.
2. heat oil in wok. throw in sliced ginger. cook till slightly golden. add chopped garlic and also allow to turn slightly golden.
3. add black bean garlic sauce and chicken cube. then add the chili and half of the chopped basil. cook quickly. make sure the pan is not too hot because the chili heat will sting your eyes and nose.
4. quickly add the mussels and stir them around.
5. add water or broth, whichever is available to you. let the water heat up to cook the mussels. add the rest of the chopped basil.
6. lastly, add the butter. this makes the broth yummy. let simmer a short while so the butter melts and blends with the broth.
7. just before serving, squeeze in calamansi. serve hot.

-------------------------------

here's another recipe that's oh so easy but oh so satisfying for those looking for strong flavors: Oyster Ceviche. ang sosyal no? in Tagalog, Kinilaw na Talaba... heheh...

Oyster Ceviche

ingredients:
10-12 FRESH oysters (talaba), shucked and removed from the shell
1 red onion, diced
2 long green chili (the sili used for sinigang), chopped into round shape
a thumb-size piece of ginger, sliced
a dash (or two) of salt and sugar to taste
1/4 c white vinegar (sometimes i add apple cider vinegar to this)
1 cup hot water

steps:
1. put the shucked oysters in colander and blanch with hot water. drain a bit and set aside.
2. in a small bowl, put in all the rest of the ingredients and add the white vinegar, stir.
3. put the blanched oysters in this mix and stir it around to blend flavors.
4. put in your serving dish and refrigerate for a short while--maybe 10 mins. serve cool.

TIP: never eat this kilawin on an empty stomach. it could get disastrous... :-D

juicing wheatgrass

Posted by Au Lim On Saturday, February 21, 2009 2 comments
siempre, in order to consume our wheatgrass, we need to juice it. puede rin nguyain pero hindi yata masaya yun although i've heard some do that. the grass should not be eaten kasi indigestible yata ito so even if you chew it, you have to spit out the fibrous pulp.


to get going, there is one crucial piece of equipment you need: the wheatgrass juicer. this juicer is quite different from the regular fruit juicer commonly found at the appliance centers. those are usually 'centrifuge-type' juicers. they extract juice via the principle similar to a washing machine spin-dryer. on the other hand, the juicer for wheatgrass is an 'auger-type' juicer. the auger looks like a big metal corkscrew that masticates the fibrous grass and there's usually some sort of a strainer that separates the juice from the fibers. slow mastication is good for wheatgrass so that there is no heat generated from friction that could destroy some of the live enzymes.

the corkscrew metal part is the auger.
the juicer is disassembled for easy washing.


in a pinch, you may probably use a regular blender then use a cheesecloth to squeeze the pulp but there are a couple of setbacks to this. for one, it's a bit messy so it could turn you off from juicing on a regular or even daily basis. second setback is that the heat generated by the fast moving blades can generate heat and oxidizes the juice so it kills some enzymes.

there are different kinds of wheatgrass juicers as well. there is an electric version that my friend Cabbie got off Ebay. there is also a manual handcranked version and this is the one i use. even the handcranked version has a few kinds: there's one that's mostly plastic, another that's cast-iron and another that is all stainless like the one i have. there are other more expensive, heavy duty ones like the Champion or Greenstar brands of juicer but i can't find them in the Philippines and they are pretty expensive. get what ever is in your price range and is readily available to you. there may be a bit of a cost but i consider it an investment in mine and my family's health.

shown here is the extracted juice in the cup while the fiber
is on the little plate in front


my juicer attaches to the edge of a counter. the wheatgrass goes on the top receptacle and when i crank, it gets pulled inside and masticated by the auger. juice drips at the bottom holes-where i put a container- while the pulp is expeled like green poo out the hole at the front of the juicer. cranking this little mechanism is a little morning 'exercise' for me, because sometimes, there is quite a bit of resistance as the grass gets pull through.

the juice drips into the cup while it is cranked

you really need very little juice--30 ml (or about 1 oz) is enough for one dose. You can put it in a shotglass so it looks pretty. i just put mine in those little plastic measuring container i get from my kiddies Tempra medicine. if you like, you can have a 2nd shot either at the same moment or maybe at night. for a healthy person, they say this is enough. if it is for someone who needs it to help cure a sickness like cancer, i heard they can take up to 10 oz a day.

i made 3 shots (3 ozs) here. the pulp is also usable.
put it in water and the resulting green-tinged water may be used as a wash
or just dispose in the compost bin.


they also say, it is best to take the juice in the morning, on an empty stomach, so it doesn't combine with other foods and would get through quickly. you can then eat 30 mins to 1 hour later.

oh yeah, it would also be a good idea to prepare a bit of water as chaser after you chug it down. although some people say it really doesn't taste too bad, i still think it is not the best thing i've tasted. it's really like i swallowed a mouthful of mowed lawn, only it's quite sweet...like nutrasweet sweet... especially when the grass is harvested at just the right time. if harvested past its prime, the sweetness gets lesser.

hubby's morning shot.

different people also have different reactions to taking it for the first time. some say it made them go poo very quickly while some say it constipates them a bit. one niece of mine threw up about an hour after gulping it down but i think it was because of something she ate earlier that didn't digest well. i think the wheatgrass even helped move it out of her system. another friend of mine told me it made him very hungry. personally, i have had most of the symptoms they reported but it was different for each time depending, i guess, on my current physical condition. but these days, i don't even notice anything different anymore.

even my little ones occasionally get a couple of tablespoons
(which is about half an ounce).
i bribe them with chocolate to get them take it. :-D
when they get used to it, i can maybe do away with the bribe.

i think you really just have to try it for yourself. bottoms up to good health!

planting my wheatgrass

Posted by Au Lim On Tuesday, February 17, 2009 2 comments
did i mention that i think wheatgrass may also help with with weightloss? i bet that got your attention. but really, i do think so--at least in my case.

ever since the december holidays started, i was too busy to attend yoga and had too many opportunities to pig out at xmas celebrations. my first opportunity to ever have a bit of exercise was 3rd week of January. yet i have lost weight instead of gained! since i don't watch the scales, the first signs i noticed were pants getting a bit looser. then when i kicked back to work after the holidays, some friends and co-workers started commenting to how i got "thinner"... could they be imagining it?

i started scouring the net for relationship between weightloss and wheatgrass but there wasn't much. probably because this wasn't the primary reason people were using it for. the closest possible explanation i have thus far are these:

1. " ...wheat grass juice is loaded with nutrients you need from vegetables. It also assists in digestion, helps metabolize energy and fat. And wheat grass helps bolster your immune system."
from http://www.articlesbase.com/weight-loss-articles/wheat-grass-juice-63485.html

2. " Wheatgrass' nutritional value is so high, many people experience a loss of appetite." ...
http://www.sfgate.com/cgi-bin/article.cgi?file=/gate/archive/1999/02/23/hyena.DTL

3. Lastly, if wheatgrass is so vitamin-laden -- especially in the B complex vits -- it could be that it has everything that are needed for proper weight maintenance and good thyroid function such as those outlined here:
http://www.ayurvediccure.com/weight-loss/vitamins-for-weight-loss.htm

so... as you can see, those were not my words. i am simply sharing with you my experience and as a "seeker of explanations", went forth and searched high and low... on the net.. for some kind of logic to it. take that as it is and with a few grains of salt as well. :-D

anyway, let's get back to the purpose of this particular blog entry: how i planted my wheatgrass. i have seen many 'styles' on how to do it, both on the net (even in You Tube), and via written instructions. i have made some modifications as to what works for ME, considering that i am in the Philippines and growing it in the climate conditions we have here. this style would also fit a person who may be working a regular day job and would have to tend it only at the end of the each work day and before leaving for work in the morning.

these are the wheat seeds or the wheatberries

there are 2 simple parts to it:
first: to SPROUT the seeds - day 1-2
then: to PLANT on soil in trays - day 3-11

materials you would need are:
- wheatberries (or seeds),
- a couple of trays or more if you like (i have 4 because i cycle them so i won't run out of grass),
- good planting soil - i tried Enrico or Plantastic which could be bought from Ace Hardware. but the one i like best is Buhaghag All Purpose Propagation Mix bought from Green 2000 at Manila Seedling. This is the big garden center at the corner of Edsa and Quezon Ave.
- spray mister,
- jar or container with cover that has holes (a large mayonnaise jar will do. just punch holes on the cover)

sprouting the seeds:
1. MEASURE the amount you need according to the size of your tray. Since we would have different tray sizes, I found that the best way to do determine the right amount to plant is to loosely lay the seeds (without overlapping) on the tray as shown below. Then take the seeds again and put them in your soaking container and proceed to the next step.


this is what i mean by laying the seeds 'loosely' to measure the right amount

2. SOAK the seeds overnight. start this before you go to sleep.


3. When you wake up the next morning (or approximately 8-12 hrs later), DRAIN the liquid. then, RINSE with tap water and drain again. do not refill with water. just leave them in the jar with holes (or a cheesegrater container in my case). forget about it till you come home at night time again (or another 8-12 hrs later).


4. before you sleep, RINSE again and DRAIN. by this time you might be seeing a little bit of a sprout. or at the very least the seeds have expanded.

5. upon waking up. RINSE again and DRAIN. there would definitely be sprouts by now.

6. when you get back home, RINSE and DRAIN. you can actually plant by this time but i like one more cycle or two.
notice the amount of seeds expands to about 4x the original as the sprouts grow.
this is about the right time it is ready for planting
.

7. RINSE and DRAIN again. Plant by now if you wish. OR one more cycle of RINSE and DRAIN if you like. by then, they might be clinging together already. shake them off gently so the little roots will not be damaged.

planting the sprouts:
1. prepare your tray by filling it with about an inch or so of soil.

shown here is Enrico potting mix but i find that the BUHAGHAG brand
propagation mix produces better grass than Enrico.


ready for planting

2. put the sprouts on top of the leveled soil in the tray.

3. water thoroughly and GENTLY with a sprinkler until water runs from the bottom holes of the tray.
lay the sprouts close together just on top of the soil.
sprinkle with a thin layer of soil on top for better moisture retention.


4. this is optional: sprinkle a thin layer of soil on top of the wet seeds. then, mist this with water. you want to use the mister so the thin layer of soil will not run.

5. cover with a second tray.
covering keeps the sprouts moist and stimulates the growth

6. leave this alone for about 24-48 hours or so.

7. when there is about and inch to an inch an a half of growth, remove the cover. mist the sprouts. no need to re-water the soil. as a matter of fact, do not water again until you feel the soil is too dry. too much watering can induce the growth of molds. if the surface is getting a bit dry just mist it. you may only need to water again by the 3rd or 4th day depending on how hot the weather is.

i removed my cover 30 hrs later. this is how they look. sprouts are light greenish beige.


48 hours later, they are a vivid apple green.


by 3rd morning, the sprouts are about 2-3 inches and even greener.


by the time the grass is about 6 inches long (around the 7th-9th day), you can start harvesting by cutting about 1/2 from the soil level. if you harvest all in one day, put in a container with a cover in the refrigerator. this will be good for about a week. do not wash the grass until you are ready to use them so they will keep longer in the fridge. if you don't harvest everything in one day, it is also ok. just don't go past 3 more days. i noticed the sweetness of the grass lessens as it gets older.

grass being harvested by the 7th-8th day.

next post... how to juice the grass! :-D

Photo Essay